Okta
The following fields are necessary in order to configure an external JWT signer with OpenZiti. This configuration will enable authentication via JWTs obtained through an Authorization Code Flow with PKCE or PKCE flow. The fields below are found in the Okta admin web interface either under the Applications or Security sections on the left navigation.
The OpenID discovery endpoint can contain fields needed to configure the external jwt signer. Verify the URL used by your Okta instance. Often this is the main tenant URL concatenated with '.well-known/openid-configuration' such as https://trial-3520298.okta.com/oauth2/auspqk0v3fpttP8fZ697/.well-known/openid-configuration
| Field | Where to Find the Value in the Okta UI | Example |
|---|---|---|
| Issuer | Security->API, from the list of Authorization Servers, the Issuer URI column | https://trial-3520298.okta.com/oauth2/auspqk0v3fpttP8fZ697 |
| Client ID | Applications->Applications, from the list of Applications the Client ID | 0oapqjp4snmzqejuh197 |
| Audience | Security->API, from the list of Authorization Servers, the Audience column | openziti-aud |
| External Auth URL | Same as the Issuer | https://trial-3520298.okta.com/oauth2/auspqk0v3fpttP8fZ697 |
| JWKS Endpoint | Use the jwks_uri field from the OpenID discovery endpoint. | https://trial-3520298.okta.com/oauth2/auspqk0v3fpttP8fZ697/.well-known/v1/keys |
| Claims Property | Often email, but can also be sub or any other claim contained in the JWT | |
| Scopes | openid is always included. | profile offline_access |
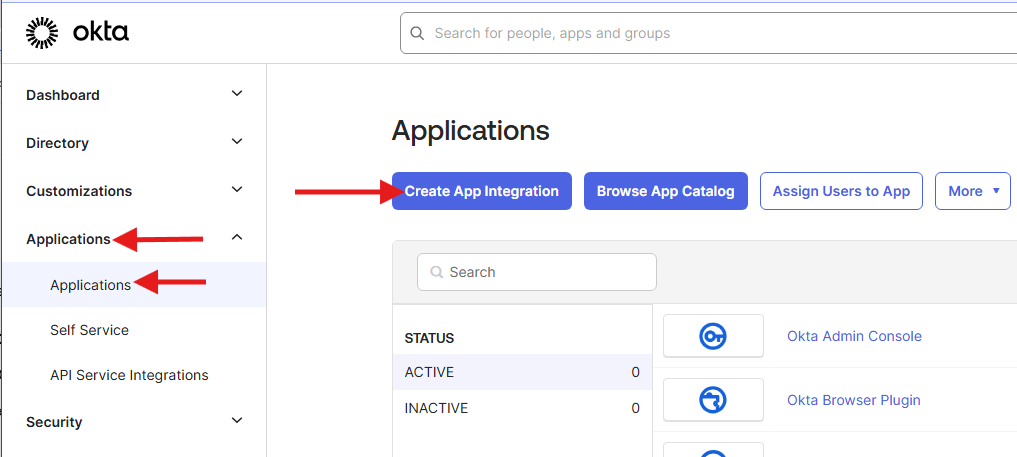
Create App Integration
From the Okta admin dashboard, expand the Applications left-side navigation and click Applications and click the Create App Integration button.
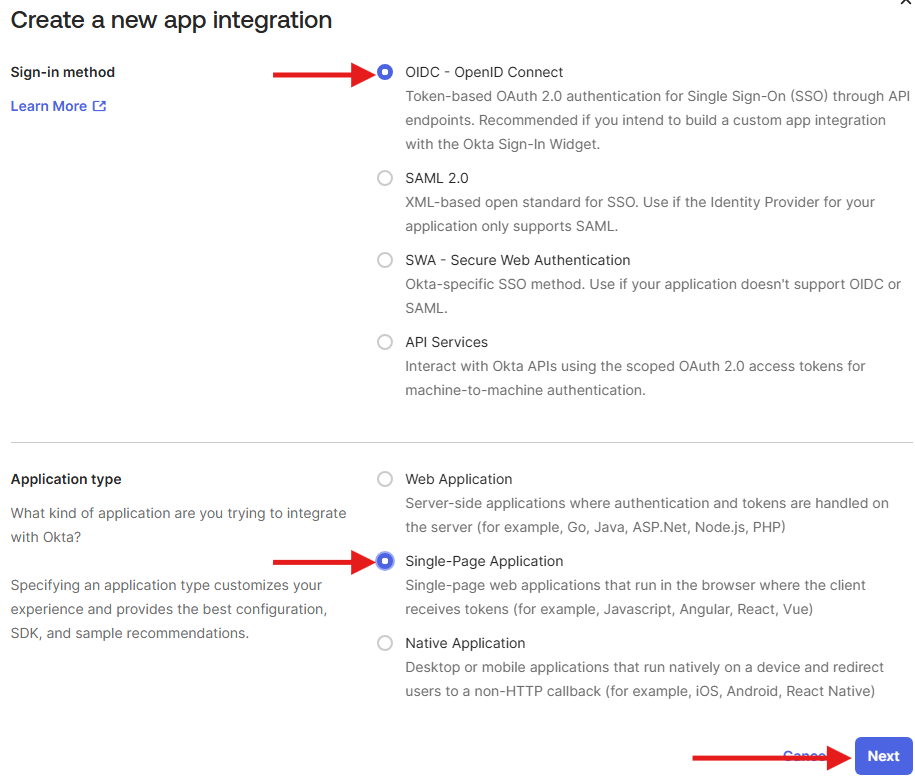
On the following screen, ensure the OIDC - OpenID Connect and Single-Page Application are selected and click the Next button.
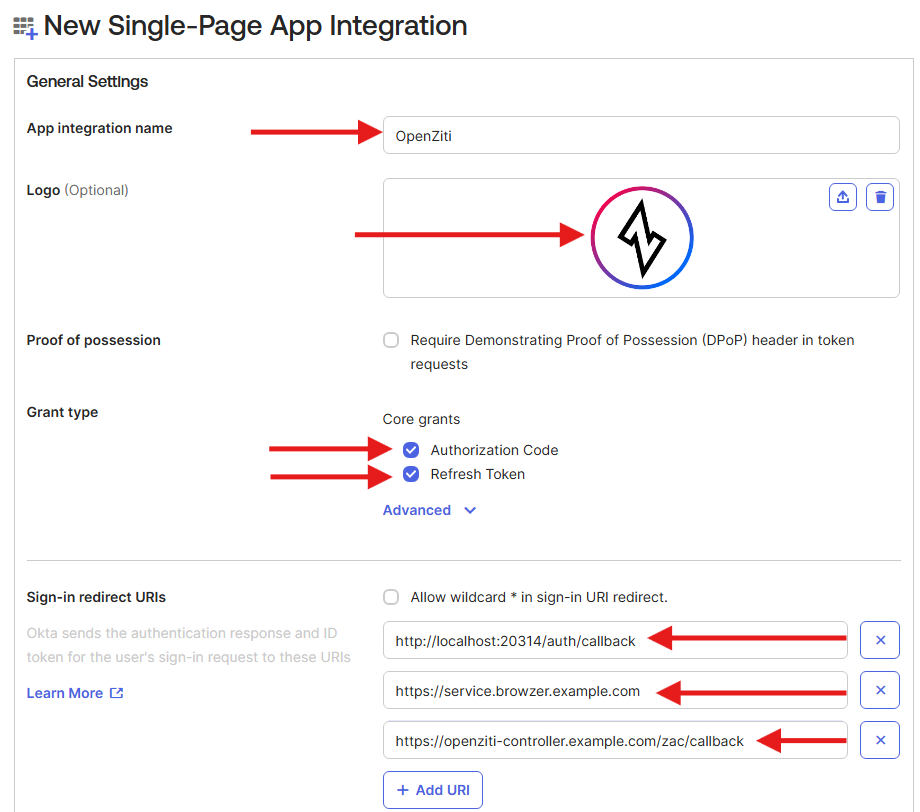
Finalize the new Single-Page App Integration by filling out the App integration name. Next, decide if the application should allow for longer-lived sessions via the Grant type and the Refresh Token (recommended). Finally, add the redirect URIs for the specific OpenZiti technology you are looking to enable.
Callback URLs
The Authorization Code Flow with PKCE or PKCE flow requires configuring callback URLs the Identity Provider (IdP) will allow redirecting to. If the URL for a specific client is not specifically listed, the IdP will deny the authentication request. Depending on the technology used to authenticate to the OpenZiti Network, different URLs need to be specified. More than one URL is allowed to be configured. Decide if you are configuring the IdP for use with tunnelers, with BrowZer or with both and add the appropriate callback urls.
In the Auth0 dashboard, with the application selected, choose the "Settings" tab and scroll down to the "Application URIs" section and add the URLs.
For Tunnelers
Tunnelers require an allowed callback URL of: http://localhost:20314/auth/callback.
For BrowZer
The URL to configure for BrowZer will vary depending on the BrowZer configuration. BrowZer requires a wildcard certificate in order to be deployed and all services are delivered from this wildcard domain. You will need to add the configured wildcard domain as the callback url.
For Ziti Admin Console (ZAC)
The URL to configure an IdP for so that ZAC will be able to authenticate will depend on how you deploy your ZAC. The current method recommended to deploy ZAC will deploy it on the same URL as the controller. For example: https://controller.example.com/zac/callback
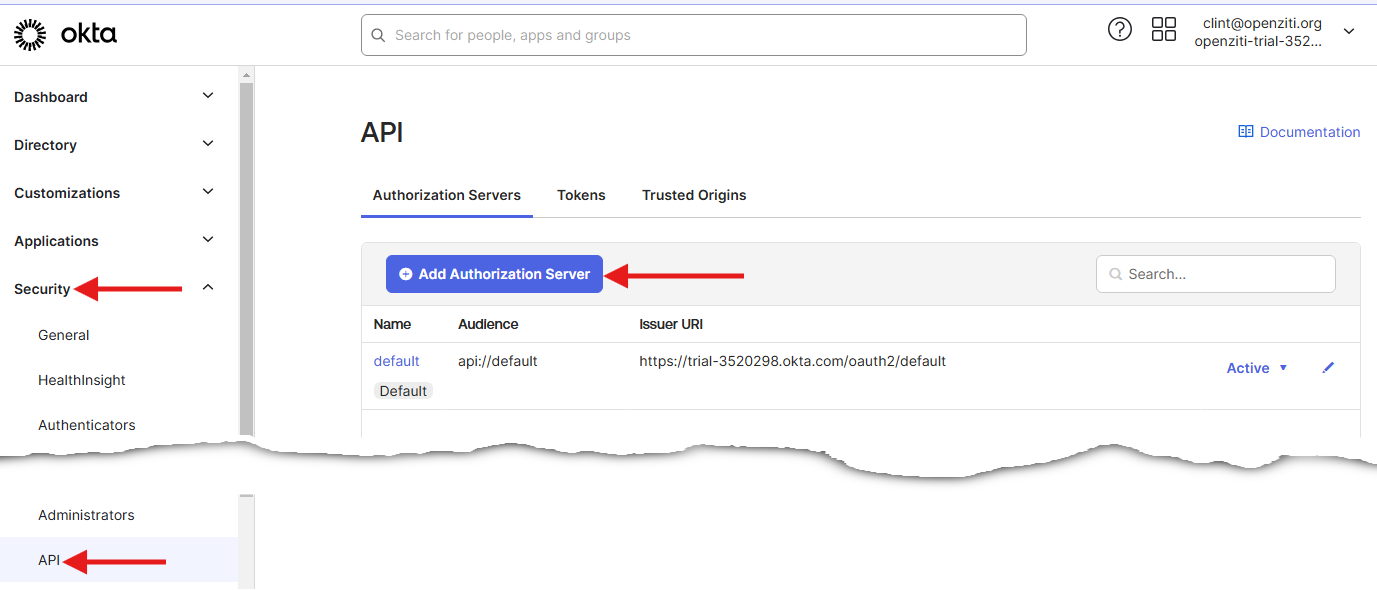
Add an Authorization Server
Within the Okta platform, an Authorization Server is used to control the audience (aud field) added to security
tokens. To create an audience usable by an external JWT signer for your OpenZiti Network, create a new
Authorization Server by going to the admin interface, click Security on the left navigation and find and click
API. On the resultant page, click Add Authorization Server.
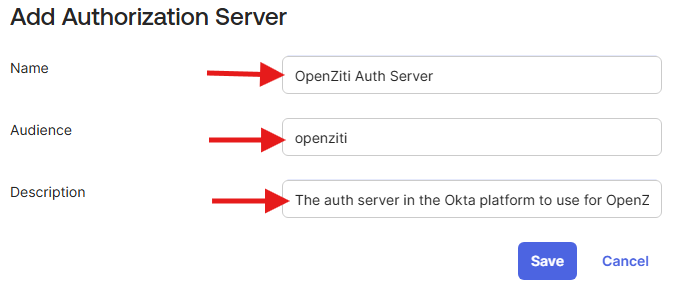
In the popup, enter values for the Name, Audience and Description. Any values are acceptable. Whatever Audience used will be the value that needs to be assigned to the external JWT signer.
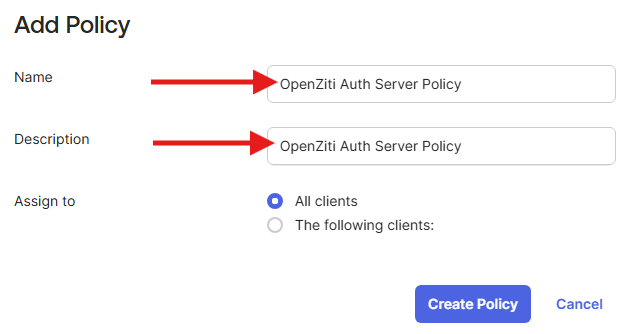
Add an Authorization Server Policy
Okta will require you to add an Access Policy to the Authorization Server mapping it to a particular set of users. Here you can choose any user or more finely control which Okta clients will leverage this Authorization Server. Add a Name and Description and choose which clients to assign the policy to.
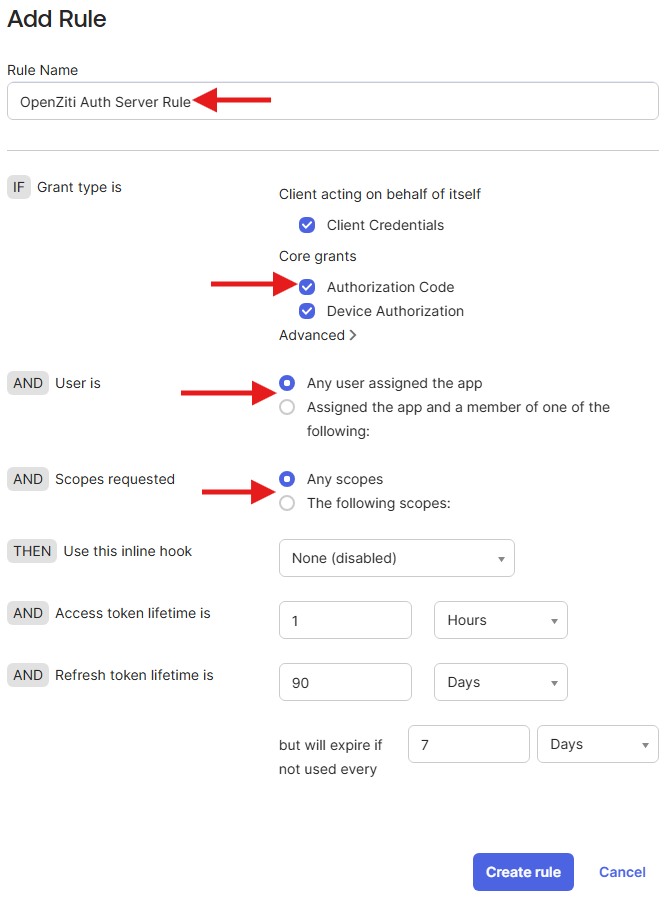
Add an Authorization Server Policy Rule
After adding the new Access Policy, you also need to add a Rule which decides when the Authorization Server is used. Click the Add rule button to add a new rule to the Authorization Server. Here, make the appropriate decisions. If you're not sure what to use, talk to your IdP administrator and ask for guidance. Add a Rule Name, decide which Grants to allow, which Users are assigned and which Scopes will activate the rule and then click Create Rule at the bottom of the form.
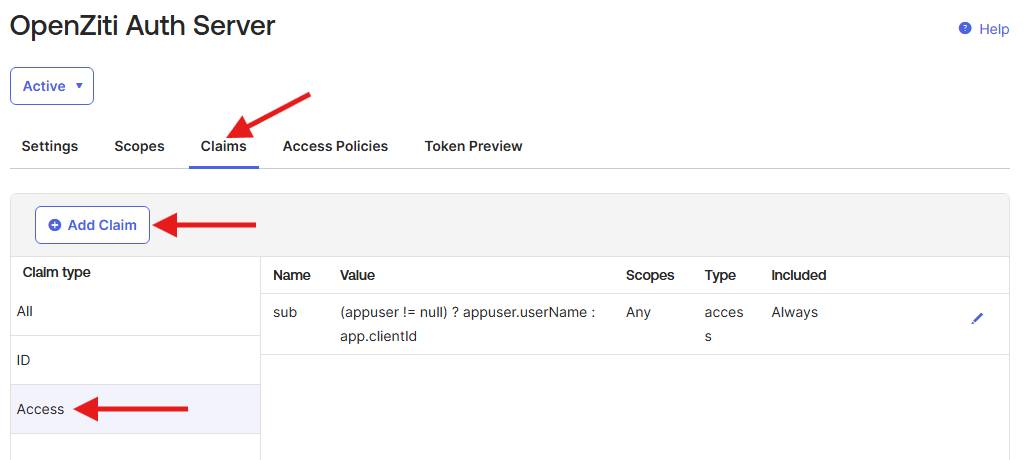
Adding an Email Claim to the Access Token
If you want to use the user's email address as a claim in your access token, this can be accomplished by creating a Claim on the Authorization Server. From the Authorization Server detail page, find the Claims tab and select it. On the form, under Claim type click Access to select the Access token then click Add Claim.
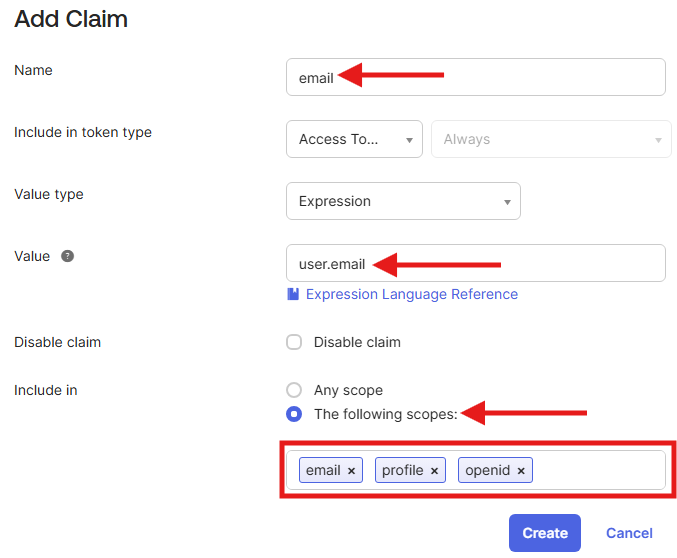
To finalize the claim fill out the fields shown and click Create when done:
- Name - the name of the claim as it appears in the JWT. You likely want this to be
email - Value - use the expression/value of
user.emailas the Value to get the user's email - Include in - what scopes if requested will activate the claim. Using
openidalone is sufficient to always return it in tokens. Assign other claims such asprofileoremailto activate the claim more specifically
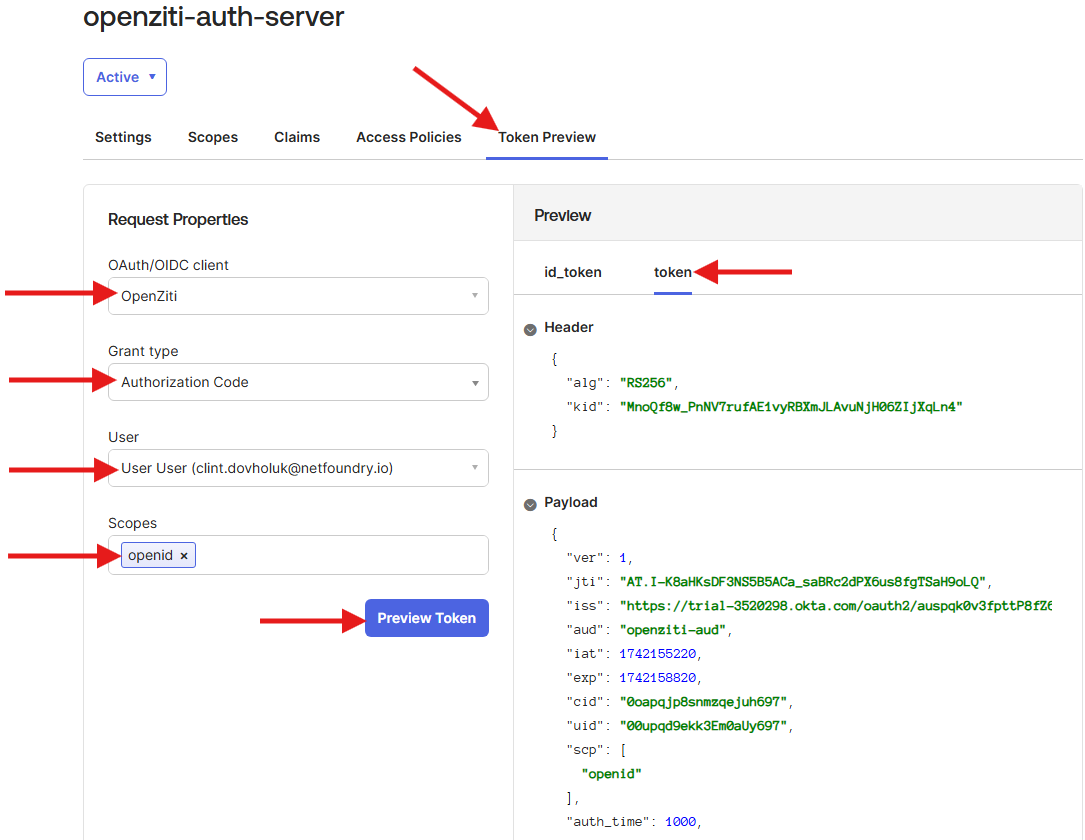
Verify Token in Okta Web Portal
The Okta web portal can also help verify tokens before using them with OpenZiti. This functionality can be quite
helpful. From the Authorization Server, click the Token Preview tab. Fill out the OAuth/OIDC client, Grant
type, User and Scopes, then click Preview Token. The resulting id_token or (access) token will be
shown in the Preview pane to the right. Use this preview to ensure the OpenZiti overlay is configured correctly.