Microsoft Entra IDP
The following fields are necessary in order to configure an external JWT signer with OpenZiti. This configuration will enable authentication via JWTs obtained through an Authorization Code Flow with PKCE or PKCE flow. All the values are found from the App registration page in the Azure portal.
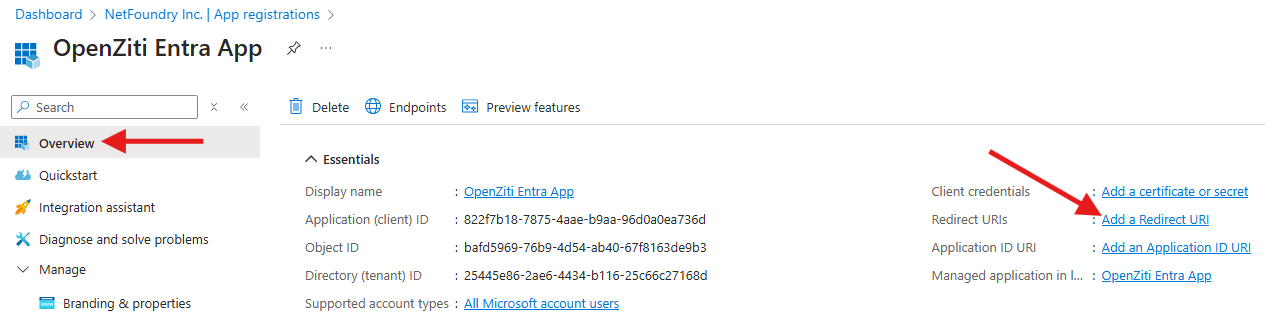
You may want to know your Microsoft Entra ID tenantid. The tenantid is found from the App
registration overview page as the Directory (tenant) ID
You also should consult the OpenID Connect metadata document found by clicking on the Endpoints button on the overview page of the App registration
| Field | Where to Find the Value in the Microsoft Entra UI | Example |
|---|---|---|
| Issuer | Consult the OpenID Connect metadata document | https://login.microsoftonline.com/23f45e36-2ae6-4434-b116-25c66c27168d/v2.0 |
| Client ID | On the App registration overview page. The Application (client) ID | 1d3584fe-b4eb-403f-b5a9-d1ed8b693b8f |
| Audience | Often the same as the Client ID however depending on how the App/API was setup, this might be the API URI | 1d3584fe-b4eb-403f-b5a9-d1ed8b693b8f |
| External Auth URL | The same value as the Issuer | https://login.microsoftonline.com/23f45e36-2ae6-4434-b116-25c66c27168d/v2.0 |
| JWKS Endpoint | Consult the OpenID Connect metadata document | https://login.microsoftonline.com/23f45e36-2ae6-4434-b116-25c66c27168d/discovery/v2.0/keys |
| Claims Property | Often unique_name, but can also be upn, or sub or any other claim contained in the JWT | unique_name |
| Scopes | openid is always included. Often offline_access and the API URI api://openziti/auth | offline_access api://openziti/auth |
Get a Microsoft Entra ID Account
If you don't already have an account you can sign up at https://entra.microsoft.com/. After logging into the Azure console, find and click on the Microsoft Entra ID icon in the navbar:

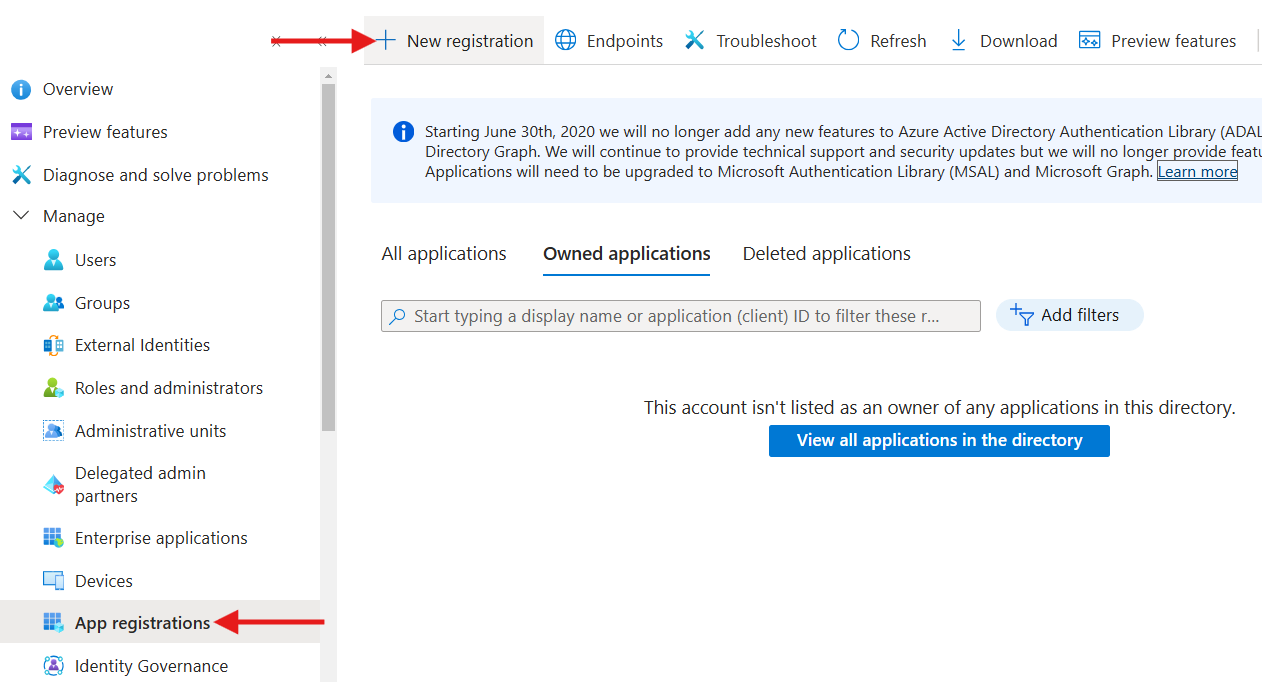
Find App registrations under Manage and select it and click New registration.
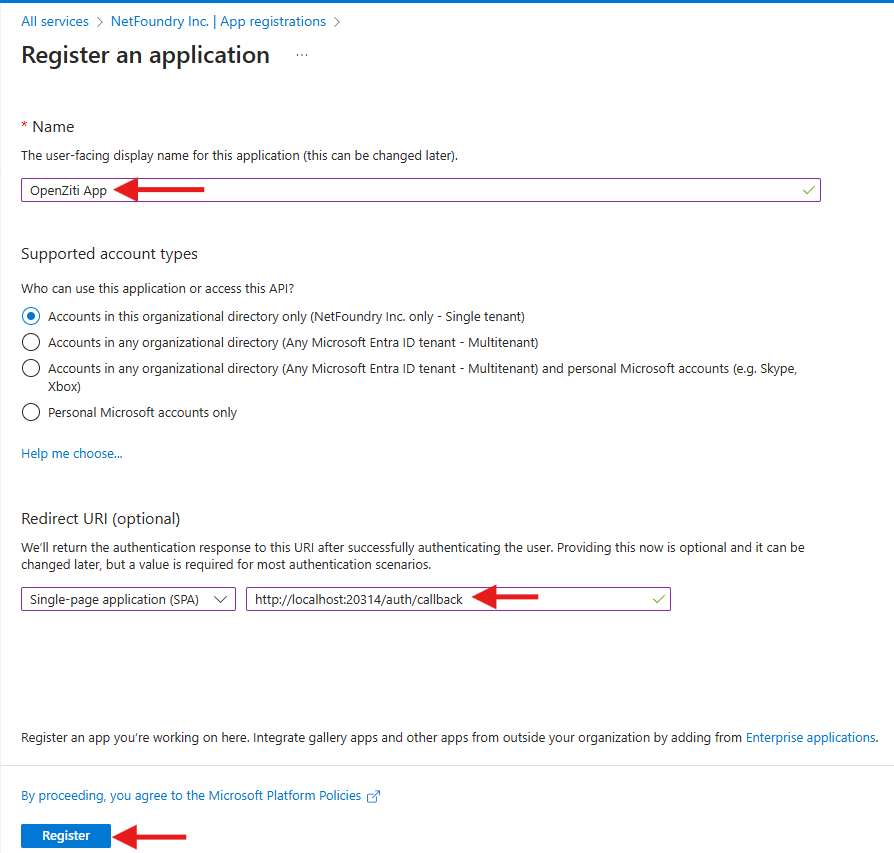
Register an Application
Registering an application will generate the Client ID necessary for configuring the ext-jwt-signer.
Enter a Name for the application and select the appropriate bullet for the Supported account types. If you are only enabling one OpenZiti technology for OIDC auth (OpenZiti tunnelers, ZAC, BrowZer), you can skip the next section and set the Redirect URI accordingly. Once finished, click the Register button at the bottom of the form. (You can optionally add a single callback here)
Redirect URIs
After creating the App registration, from the Overview page click Add a Redirect URI
Callback URLs
The Authorization Code Flow with PKCE or PKCE flow requires configuring callback URLs the Identity Provider (IdP) will allow redirecting to. If the URL for a specific client is not specifically listed, the IdP will deny the authentication request. Depending on the technology used to authenticate to the OpenZiti Network, different URLs need to be specified. More than one URL is allowed to be configured. Decide if you are configuring the IdP for use with tunnelers, with BrowZer or with both and add the appropriate callback urls.
In the Auth0 dashboard, with the application selected, choose the "Settings" tab and scroll down to the "Application URIs" section and add the URLs.
For Tunnelers
Tunnelers require an allowed callback URL of: http://localhost:20314/auth/callback.
For BrowZer
The URL to configure for BrowZer will vary depending on the BrowZer configuration. BrowZer requires a wildcard certificate in order to be deployed and all services are delivered from this wildcard domain. You will need to add the configured wildcard domain as the callback url.
For Ziti Admin Console (ZAC)
The URL to configure an IdP for so that ZAC will be able to authenticate will depend on how you deploy your ZAC. The current method recommended to deploy ZAC will deploy it on the same URL as the controller. For example: https://controller.example.com/zac/callback
Add Redirect URIs
Under Platform configurations, find the Add a platform button and click it. Depending on the OpenZiti technology being enabled, choose the appropriate option:
- For OpenZiti Tunnelers, choose Mobile and desktop applications
- For BrowZer or Ziti Admin Console (ZAC), choose Single-page application
Choose the type of token desired. Ideally, an access token will be used with OpenZiti but if necessary ID tokens can be used.

With the callback URIs specified, click Save.
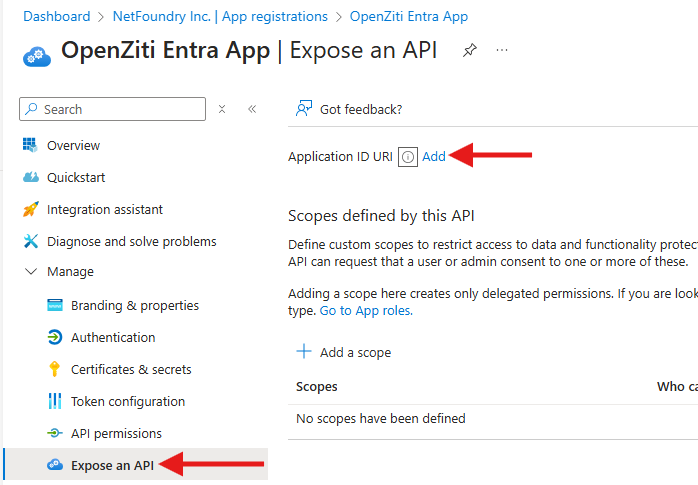
Expose an API
For Microsoft Entra to produce an access token with a customized audience you must Expose an API and add a scope tied to the exposed API. This will allow Microsoft Entra to create an access token that the OpenZiti controller can verify.
In Microsoft Entra from the App registration page created above, click Expose an API and Add an Application ID
URI. A form will pop up on the side, enter a URI. It's common to prefix the URI with api:// such as api://openziti.
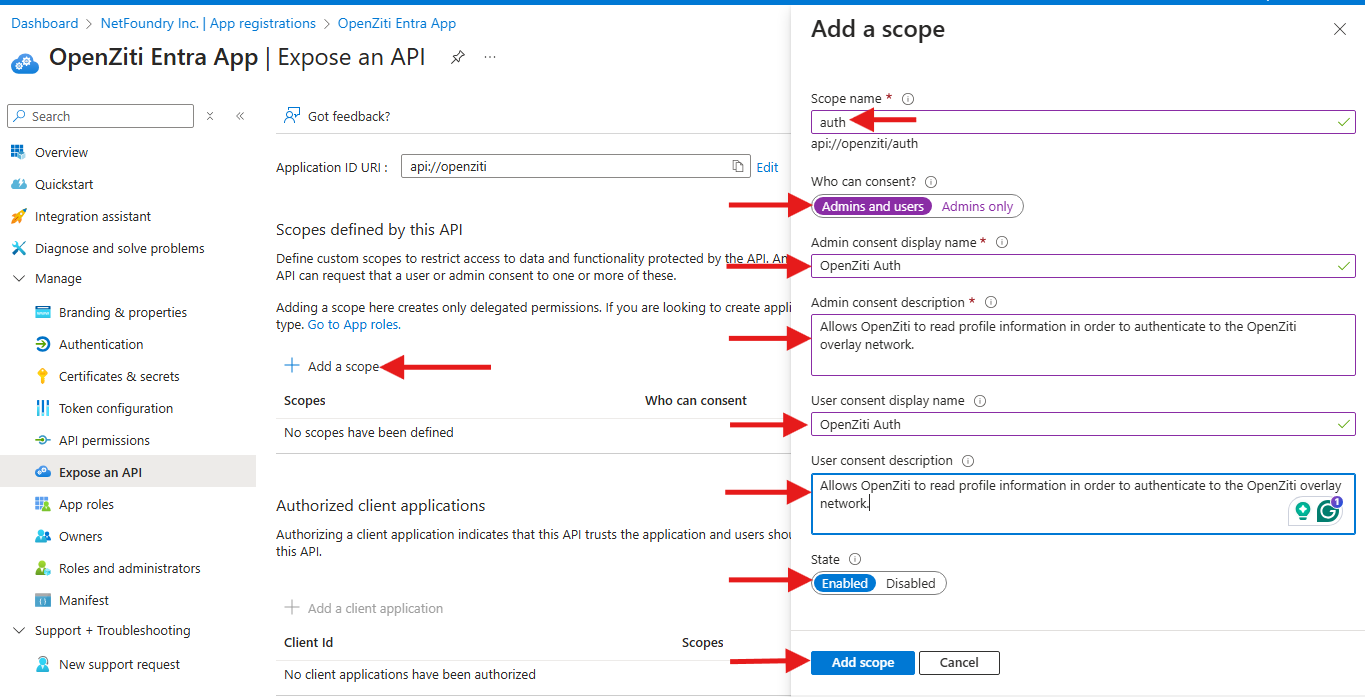
Add a scope
Adding a scope to an exposed API is what instructs Microsoft Entra to add an audience claim to the access token
which is specific to OpenZiti. Click on Add a scope and the Add a scope popup form will come up. Fill out the
fields accordingly. The Scope name is probably the most important as this is what you will reference on the
external JWT signer in the controller. For example, as shown auth is used, but it can be any value.
Continue filling out the other fields, add display names and consent descriptions as you see fit. Be sure to set the State value to Enabled to allow clients to request the scope.
A Note About Audiences
When creating the App Registration, it seems that the value selected for the Supported account types influences the ability to change the audience. If "Accounts in this organizational directory only (Your Company only - Single tenant)" is chosen, the access token's audience will be determined by the URI added to the "exposed api". Adding, then requesting a scope added to that "exposed api" will produce an access token with the desired audience.
Example
- Create an App registration with the name My App Registration
- Add the Application ID URI of
api://my-app-registration - Add a scope to the exposed API:
auth - On the
ext-jwt-signer, assign the scopeapi://my-app-registration/auth
After successfully authenticating, the access token will have the audience of api://my-app-registration:
{
  "aud": "api://my-app-registration",
  "iss": "https://sts.windows.net/25445e86-2ae6-4434-b116-25c66c27168d/",
  "iat": 1741991722,
  "nbf": 1741991722,
  "exp": 1741996813,
  ... <jwt continues> ...
}
Common Errors
Using SPA for Tunnelers
failed to exchange token: oauth2: "invalid_request" "AADSTS9002327: Tokens issued for the 'Single-Page Application' client-type may only be redeemed via cross-origin requests.
This error is indicating the callback used for tunnelers (http://localhost:20314/auth/callback) is not allowed when
using the MS Entra "SPA" platform. The callback cannot be specified platform type SPA. Move the callback URL to the
"Mobile and desktop applications" platform.